Content found in this wiki may not reflect official Church information. See Terms of Use for more information.
Installing MarkLogic
From TechWiki
Jump to navigationJump to search
Installing MarkLogic on Windows
(These instructions are for Windows XP, Vista, and 7. Installation and server start-up may differ slightly for other operating systems.)
- Download the latest version of the MarkLogic Server for your operating system.
- Upon clicking on the download link, you will need to agree to MarkLogic's Terms of Use.
- Execute the MarkLogic Server installer.
- Choose a "Typical" setup. This will take about 5 minutes.
- After installation is complete start the Mark Logic Server.
- (Windows Only) Go to Start > All Programs > MarkLogic Server > Start MarkLogic Server
- Important! Right-click on "Start MarkLogic Server" and select "Run as administrator". Otherwise, the server may not start.
- If you get the error message "The application failed to initialize properly...", then see MarkLogic Server 4.x System Requirements to download and install the necessary dll for your operating system. Then try starting the server again.
- If start-up succeeds, you will not see any message.
- (Windows Only) Go to Start > All Programs > MarkLogic Server > Start MarkLogic Server
- Go to the Mark Logic administration console:
- (Windows Only) Go to Start > All Program > MarkLogic Server > Admin MarkLogic Server.
- A browser window will open and you will be prompted to enter a license key.
- If you do not yet have a license, do one of the following:
- (Employees Only) Request a license key by emailing DL-ICS-MARKLOGIC.
- Enter the licensee and the license key, then click "OK". The MarkLogic Server will restart.
- (Non-employees Only) You may request a free license for community development by clicking the "Free" button and then entering the required information in the supplied form.
- Licensee. This is your name.
- Company. Do NOT put the name of the Church or any of its business entities in this field. You may put "Home" or "Community" in this field if you will be using the MarkLogic Server for personal or community development.
- Email. This is your personal email address.
- Choose "Select Community License".
- Make a copy of your license information and then click "OK". The MarkLogic Server will restart.
- (Employees Only) Request a license key by emailing DL-ICS-MARKLOGIC.
- If you do not yet have a license, do one of the following:
- Accept the license agreement by scrolling to the bottom of the page and clicking "Accept". The MarkLogic Server will restart.
- You will now be prompted to install the initial databases and application servers. Click "OK" to continue. When installation is complete. The server will restart.
- When prompted to enter an Admin username and password, enter "admin" as the user and "admin" as the password. Confirm the password and click "OK" to continue.
- When prompted, enter the user name and password you supplied. You will then be redirected to the MarkLogic Server administration console.
- Configure an XDBC server
- Expand "Groups", then expand "Default", and then select "App Servers".
- Click the tab "Create XDBC"
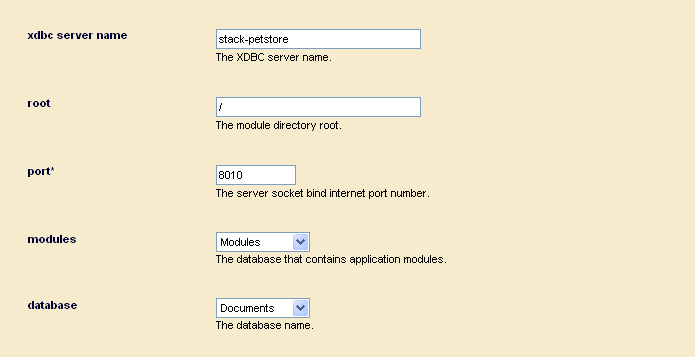
- Supply an XDBC server name.
- For the Stack Petstore project, enter "stack-petstore".
- Supply a value for the module directory root.
- For the Stack Petstore project, enter "/".
- Supply a value for the port the XDBC server will listen to for connections.
- For the Stack Petstore project, enter "8010".
- For the modules field, choose "Modules" from the list of options.
- Leave all other fields as they are, and click "OK" at the top of the page.
- Supply an XDBC server name.
- To try out your Mark Logic installation, go to http://localhost:8000 and login with your admin username.

