Content found in this wiki may not reflect official Church information. See Terms of Use for more information.
Broadcasting Church Events Through Satellite
>Meetinghouse Technology >Broadcasting Events
As a technology specialist (TS), you are responsible for ensuring the effective delivery of the broadcast solution that best meets the needs of your meetinghouse. Generally, a TS chooses between satellite, internet streaming, and downloading broadcasts for future playback. This section will focus on satellite broadcasts. Please keep in mind that in addition to choosing a broadcast solution, it is important to have a backup plan in case of unforeseen complications. Internet streaming can be used as a backup for satellite (and vice-versa).
The tasks to perform one week prior to the broadcast and on the day of the event are listed below. Test all equipment at least one week before the event to allow sufficient time to resolve any issues.
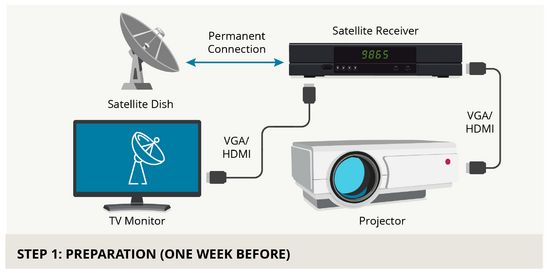
STEP 1: PREPARATION (ONE WEEK BEFORE)
- Test to ensure the satellite receiver functions properly.
- Ensure audio and video equipment are functional.
- Check that the chapel audio distribution system plays the satellite audio.
- Check that the overflow rooms (Primary room, Relief Society room, cultural hall, etc.) play the satellite audio.
- Activate overflow audio in each room to play the audio from the chapel.
- If satellite audio is turned on in the chapel, it will play throughout the entire meetinghouse when overflow audio is activated in the other rooms.
- Activate overflow audio in each room to play the audio from the chapel.
- Test the projector to ensure it projects satellite video properly.
- Test TV monitors in overflow rooms (if necessary).
- Plug the TV system into the satellite distribution system.
- Ensure the satellite receiver is configured to the correct language pairings.
- Click here for language pairings.
- Ensure there is sufficient cable length to run AV to projectors.
- Determine backup strategies for audio and video in case of satellite failure.
- Internet streaming is a common backup for satellite.
STEP 2: DAY OF EVENT
- Confirm that the satellite receiver is still functioning.
- Activate the live feed on the receiver.
- Set up the projector in the chapel and connect to receiver.
- Cover any cables on the floor with no-residue colored tape (such as gaffer’s tape) for safety.
- Activate chapel audio and flip the switch to activate satellite audio.
- Set up TV monitors in overflow rooms if needed.
- Set up any necessary special technology for accessibility (e.g. ALS, ASL, CC).
- Check audio and video levels in all rooms and adjust as necessary.
- Set up backup strategies for audio and video in case of satellite failure.
- After the broadcast, please take a moment to fill out a brief post-event survey.
- Currently, the survey is only available in English.
Note: A few minutes before the broadcast begins, the satellite will switch from a test feed to the live feed. Audio and video will drop for about 60 seconds. When they return, audio levels may need adjusting.
